
 Technologies
This article is a step by step guide to get the Geo-coordinates of an Address in Xamarin Forms. This is also known as Reverse Geocode.
For this article, we need to install Xamarin.Forms.Maps package from NuGet package. This package provides GeoCoder class which converts string Address to latitude and longitude.
We will proceed step by step to understand better.
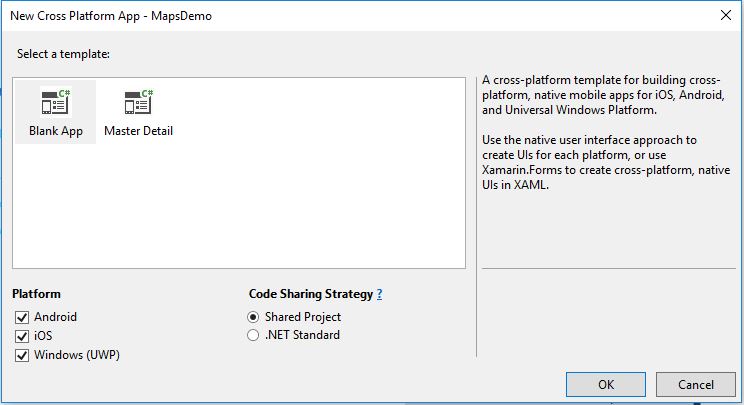
Step-1: Create a New Xamarin Forms Project. For this Open Visual Studio -> File -> New Project -> in the left pane, under the Installed tab, select Visual C# -> Select Mobile App (Xamarin.Forms) -> Enter File Name and Location. -> Click the Ok button -> Select a template (Blank App), check all Platform and Sharing Strategy as “Shared Project” -> Click Ok button.

Step-2: Install Xamarin.Forms.Maps Package. In the Menu bar, select Tools TAB -> Select NuGet Package Manager -> Select Manage NuGet Packages for Solutions -> Under “Browse” TAB search Xamarin.forms.maps and install for all Mobile O.S. -> For pop-up click “OK” and “I Accept” button. -> Wait till the output Window shows “Finished”.

Step-3: Add Xamarin.Forms.Maps package.
For Android:
Expand Android project -> Open MainActivity.cs File.
Add Namespace: using Xamarin.Forms.Maps;
Add following line of code below Forms.Init()
global::Xamarin.Forms.Forms.Init(this, bundle);
global::Xamarin.FormsMaps.Init(this, bundle);
For iOS:
Expand iOS project -> AppDelegate.cs Open File.
Add Namespace: using Xamarin.Forms.Maps;
Add following line of code below Forms.Init();
global::Xamarin.Forms.Forms.Init();
global::Xamarin.FormsMaps.Init();
Step-4: By default MainPage.xaml is created if not Add a New Item -> Under Installed Tab -> Expand Visual C# -> Xamarin.Forms -> Select Content Page with extension (FileName.xaml) -> Click Add button.
Step-5: Some configuration that you need to follow strictly.
For Android:
To use Google maps on Android device you need to generate an API key and place it on your Android project. Follow the instruction for generating API key Obtaining Google Map Key.
Note: If the key is not valid/added you will not be able to see the map or some grey screen appears.
Once the key is generated you need to place the key in the Android project Properties/AndroidManifest.xml file. For than Open Android project -> Open Properties -> Open AndroidManifest.xml file.
Example:
<application android:label="MapsDemo.Android">
<!-- Put your Google Maps V2 API Key here. -->
<meta-data android:name="com.google.android.geo.API_KEY" android:value="##############################################" />
<meta-data android:name="com.google.android.gms.version" android:value="@integer/google_play_services_version" />
</application>
Also, you need to enable some permissions. R.Click on the Android project and select Properties -> On the Left pane select Android Manifest -> Scroll down to see the Required Permission and check the below permissions:
1. AccessCoarseLocation
2. AccessFineLocation
3. AccessLocationExtraCommands
4. AccessMockLocation
5. AccessNetworkState
6. AccessWifiState
7. Internet
And save the file. To see the added permissions. Open Android project/ Properties/AndroidManifest.xml file.
Example:
<uses-permission android:name="android.permission.ACCESS_COARSE_LOCATION" />
<uses-permission android:name="android.permission.ACCESS_FINE_LOCATION" />
<uses-permission android:name="android.permission.ACCESS_LOCATION_EXTRA_COMMANDS" />
<uses-permission android:name="android.permission.ACCESS_MOCK_LOCATION" />
<uses-permission android:name="android.permission.ACCESS_NETWORK_STATE" />
<uses-permission android:name="android.permission.ACCESS_WIFI_STATE" />
<uses-permission android:name="android.permission.INTERNET" />
Step-6: Add below code on MainPage.xmal and MainPage.xaml.cs file.
Use below code on MainPage.xaml
<?xml version="1.0" encoding="utf-8" ?>
<ContentPage xmlns="http://xamarin.com/schemas/2014/forms"
xmlns:x="http://schemas.microsoft.com/winfx/2009/xaml"
xmlns:local="clr-namespace:MapsDemo"
x:Class="MapsDemo.MainPage"
Title="Map View">
<ContentPage.Content>
</ContentPage.Content>
</ContentPage>
Use below code on MainPage.xaml.cs
using System;
using System.Collections.Generic;
using System.Linq;
using Xamarin.Forms;
using Xamarin.Forms.Maps;
namespace MapsDemo
{
public partial class MainPage : ContentPage
{
Geocoder geocoder;
public MainPage()
{
InitializeComponent();
geocoder = new Geocoder();
AddMapComponent();
}
public async void AddMapComponent()
{
try
{
IList<Position> positions = new List<Position>();
var addressPosition = new Position();
//Test : Getting Positions For Address
var address = "The City of Taj Mahal, Agra, Uttar Pradesh, India";
var approximateLocations = await geocoder.GetPositionsForAddressAsync(address);
foreach (var position in approximateLocations)
{
addressPosition = new Position(position.Latitude, position.Longitude); ;
}
positions.Add(addressPosition);
var map = new Map(MapSpan.FromCenterAndRadius(new Position(0, 0), Distance.FromMiles(0.3)))
{
IsShowingUser = true,
MapType = MapType.Street,
HeightRequest = 100,
WidthRequest = 960,
VerticalOptions = LayoutOptions.FillAndExpand
};
var stack = new StackLayout { Spacing = 0 };
stack.Children.Add(map);
Content = stack;
foreach (var position in positions)
{
var pin = new Pin
{
Type = PinType.Place,
Position = position,
Label = "Imagination Hunt"
};
map.Pins.Add(pin);
}
if (positions.Count() > 0)
{
MapSpan span = new MapSpan(positions.First(), 360, 360);
map.MoveToRegion(span);
}
}
catch (Exception ee)
{
Console.WriteLine(ee);
}
}
}
}
Step-7: Run the project.

Hope you find the article helpful and interesting. For any query, comment us below.
Next - What is Xamarin?
Keep learning and sharing...

No comments:
Post a Comment