Drop Down MenusCSS Drop Down MenuPure CSS Dropdown Menu
Showing posts with label Sql Server. Show all posts

Monday, 18 June 2018

How to find relationship between Purchase order table and Cost Center in Dynamics AX? – Solved

Hi developers, I am writing this blog for helping one of my internet friend who asked for my help.

Query - How to get Financial Dimension Cost Center value for the Report in Dynamics AX? He needs financial dimension cost center value for Purchase order report. 


Solution Query:

select distinct CC.NAME,D1.DIMENSIONATTRIBUTEVALUESET
from dbo.PURCHTABLE P
join dbo.PURCHLINE PL on P.PURCHID = PL.PURCHID
left join DIMENSIONATTRIBUTEVALUESETITEM D1 on D1.DIMENSIONATTRIBUTEVALUESET = PL.DEFAULTDIMENSION
left join DIMENSIONATTRIBUTEVALUE D2 on D2.RECID = D1.DIMENSIONATTRIBUTEVALUE
left join DIMENSIONATTRIBUTE D3 on D3.RECID = D2.DIMENSIONATTRIBUTE        
left join DimAttributeOMCostCenter CC on CC.VALUE = D1.DISPLAYVALUE
where D3.NAME = 'CostCenter'


Hope you find the article helpful and interesting. For any query, comment us below.


Click imagination hunt to read latest blogs.


Keep learning and sharing...
Read More »

Friday, 25 May 2018

How to view the sql for views in sql server - Solved

Hi developers, you can script views in two ways. I am sharing the query as well as graphical approach, for future reference.

I. By using programmatical(inbuilt stored procedure) approach:

On the standard bar. Open a New Query Window. Write the following query and Click on Execute button.

Syntax:

sp_helptext [ViewName]

Example:

sp_helptext [v_Employee]

Copy and paste the Result to the Query window.

CREATE VIEW v_Employee
AS select *
from [dbo].[Employee]

The highlighted query is the actual query in the view.

II. By graphical approach

Follow the below steps: -

1. In Object Explorer, expand the Views Folder for which you want to view the script.
2. R.Click the View and select Script View as -> Select Create To/Alter To -> New Query Editor Window.


Hope you find the article helpful & interesting.


For any query, comment us below.


Click imagination hunt to read latest blogs.


Keep learning and sharing...
Read More »

Thursday, 17 May 2018

How to cast bigint to nvarchar in sql server - Solved

Hi developers, I am writing this blog for helping one of my internet friend who asked for my help.


I am sharing the query on which the error is occurring for future reference.

Example:

declare @EmployeeTransID bigint
set @EmployeeTransID=33234000234454
declare @EmployeeTransIDGUID nvarchar(50)

select @EmployeeTransID as EmployeeTransID
set @EmployeeTransIDGUID = N'IMGHUNT' + @EmployeeTransID
select @EmployeeTransID as EmployeeTransID, @EmployeeTransIDGUID as EmployeeTransIDGUID


Error:
Error converting data type nvarchar to bigint.

Solutions:
You need to typecast the bigint to varchar.

set @EmployeeTransIDGUID = N'IMGHUNT' + CAST(@EmployeeTransID as varchar(50))


Hope you find the article helpful & interesting.


For any query, comment us below.


Click imagination hunt to read latest blogs.


Keep learning and sharing...
Read More »

Friday, 11 May 2018

How to cast bigint to varchar in SQL Server? - Solved

Hi developers, I am writing this blog for helping one of my internet friend who asked for my help.


I am sharing the query on which the error is occurring for future reference.

Example:

declare @EmployeeTransID bigint
set @EmployeeTransID=33234000234454
declare @EmployeeTransIDGUID varchar(50)

select @EmployeeTransID as EmployeeTransID
set @EmployeeTransIDGUID = 'IMGHUNT' + @EmployeeTransID
select @EmployeeTransID as EmployeeTransID, @EmployeeTransIDGUID as EmployeeTransIDGUID

Error:
Error converting data type varchar to bigint.

Solutions:
You need to typecast the bigint to varchar.

set @EmployeeTransIDGUID = 'IMGHUNT' + CAST(@EmployeeTransID as varchar(50))


Hope you find the article helpful & interesting.


For any query, comment us below.


Click imagination hunt to read latest blogs.


Keep learning and sharing...
Read More »

Tuesday, 10 October 2017

Configuration with SQL Server Reporting Services

This article is the step by step guide to configure SQL Server Reporting Service. But first we need to see what are the software requirements: -

(1) First, we need to have a browser (Recommended Internet Explorer).
(2) Second, we need to have a MS SQL Server. Download SQL Server.
(3) Third, we need Report Builder. Download Report Builder directly from here.


Before configuring to SQL Server Reporting Services you need to start the Reporting Services Configuration Manager (RSCM). Now, we will proceed step by step to understand better.

Step-1: Open browser. Prefer Internet Explorer.

Step-2: Type the URL that you have obtained from the previous blog.

(1) To access Reports: You need to type URL. It may look something like this http://<server name>:<Port Number>/Reports
For eg.- http://lenovo-pc:9090/Reports  OR   http://localhost:9090/Reports

(2) To access Report Server: You need to type URL. It may look something like this http://<server name>:<Port Number>/ReportServer
For eg.- http://lenovo-pc:9090/ReportServer  OR   http://localhost:9090/ReportServer


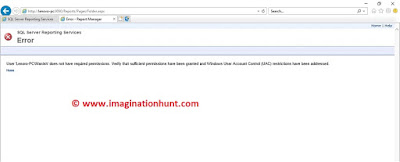
Note: Read the article How to grant full permissions to a user in SQL Server if you are facing this error: “The permissions granted to user 'Lenovo-PC\Manish' are insufficient for performing this operation. (rsAccessDenied)


Step-3: Once you click Enter. You will be redirected to http://<server name>:<Port Number>/Reports/Pages/Folder.aspx. The URL changed automatically from http://localhost:9090/Reports to http://lenovo-pc:9090/Reports/Pages/Folder.aspx.


Step-4: On Home Tab, click on Folder Settings.


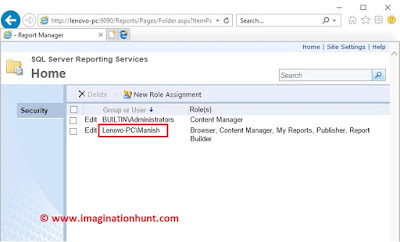
Step-5: In the Security TAB, click on New Role Assignment.


Step-6: Add roles to the user. For that “Create Group or User Name”. Select the User by checking the checkbox and Click on "OK" button.


Step-7: Once the user is created successfully. It may look something like this "<Domain Name>\<User Name>" for ex- Lenovo-PC\Manish


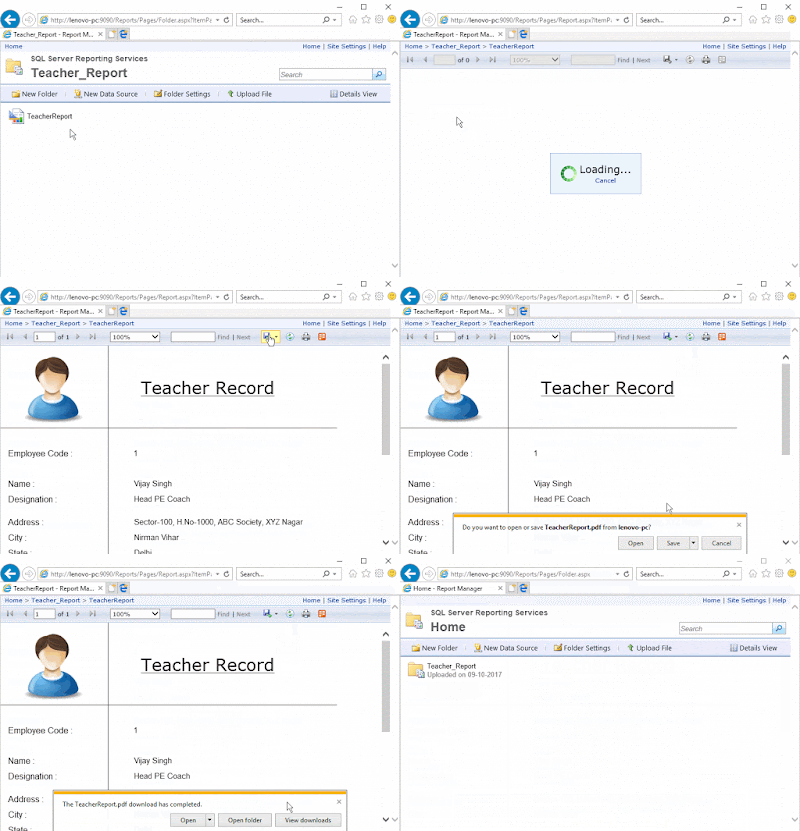
Step-8: Add New Folder and rename it “Teacher_Report”. Open the folder and Upload your reports here.


Step-9: Click the Report. The report will open in its preview mode. You can save the report in given format (eg. PDF, Word, Excel).


Hope you find the article interesting.


For any query, comment us below.


Click imagination hunt to read latest blogs.


Keep learning and sharing...
Read More »

Wednesday, 27 September 2017

How to grant full permissions to user in SQL Server

In this article, we will learn how to grant permissions in SQL Server step by step.

Step-1: Open SQL Server with Administrator Permissions.

Step-2: Connect to the server either by any of the Authentication modes: - Windows Authentication or SQL Server Authentication.
 
Grant permission in SQL Server

Step-3: Once connected to the server. Expand ‘Security’ Tab. Expand ‘Login’ Tab. Select the Connection name for which you want to grant permission -> R.Click and select properties.


Step-4: Click Server Roles. Initially, you may notice that only ‘public’ checkbox is checked. But to access the reports you need to check all checkboxes. Means all permission need to be granted. Click OK.


Step-5: Restart the System.

There you go, you have granted full permission to selected user in SQL Server.


But, if you are trying to access RSCM. Then read the next two steps: -

Step-6: Once the system is started. Start the Reporting Services Configuration Manager (RSCM). And select the ‘Report Manager URL’ tab and click the URL to open the SQL Server Reporting Service in Internet Explorer.

Step-7: Hopefully, Reporting Server open this time.


Hope you find the article interesting.


For any query, comment us below.


Click imagination hunt to read latest blogs.


Keep learning and sharing...
Read More »

Tuesday, 26 September 2017

How to: Start Reporting Services Configuration Manager

In this article, we will learn how to start RSCM (Reporting Services Configuration Manager) to configure a Report step by step. But first we need to see what are the software requirements: -

(1) First, we need to have a MS SQL Server. Download SQL Server.
(2) Second, we need Report Builder. Download Report Builder directly from here.

This article is the continuation of the previous article How to create SSRS Report using SQL Server and Report Builder?

Now, we will proceed step by step to understand better. Guys, following first three steps, will start your reporting service which is the aim of this article. And last two steps help you to give a URL which we will use to host our service in our upcoming SSRS article series. Without wasting time let’s start:

Step-1: Press Windows and search ‘reporting service’. Open Reporting Services Configuration Manager (RSCM) with Administrator permission.


Step-2: Click ‘Find’ it will automatically find the local server name/computer name on which the RSCM is going to RUN. But if you want to connect to a remote SQL Server that is installed on the remote server just type the server name. Once you’ve your Server Name and Report Server Instance. Click Connect button.

Note: Only Report Server Instance for the current version of SQL Server appear in the list. Earlier and advance version of SQL Server are not supported.


Step-3: Once connected. Click "Start" button to start the reporting server.


Note: If you are facing error in starting the server.


Solution: What you have to do is Press CTRL + ALT + DELETE Key or directly open Task Manager Window. Open ‘Processes’ Tab -> Search for Reporting Services Service and Click End Task button. Restart your RSCM and try to connect. Hopefully, you will connect this time.

Following the next two steps will help you to give a URL which we will use to host our service to the internet.

Step-4: Go to "Web Service URL" Tab.

(1) Then, Click "Advanced" button. Add a new HTTP Port. By default 80 port is created.
Add a new TCP Port 9090 or whatever and IP Address to "All Assigned". Click ‘OK’ button. Again click ‘OK‘ button at Advanced Multiple Web Site Configuration windows.
(2) Change the Virtual Directory from ReportServer_SQLEXPRESS to ReportServer and Click ‘Apply’ button.


Step-5: Go to "Report Manager URL" Tab.

(1) Then, Click "Advanced" button. Add a new HTTP Port. By default 80 port is created.
Add a new TCP Port 9090 or whatever and IP Address to "All Assigned". Click ‘OK’ button. Again click ‘OK’ button at Advanced Multiple Web Site Configuration windows.
(2) Change the Virtual Directory from Reports_SQLEXPRESS to Reports and Click ‘Apply’ button.


Step-6: Copy both the URL. It may look something like this
Web Service URL
http://<servername>:<PortNumber>/ReportServer
For eg.- http://lenovo-pc:9090/ReportServer

Report Manager URL
http://<servername>:<PortNumber>/Reports
For eg.- http://lenovo-pc:9090/Reports


Hope you find the article interesting.


For any query, comment us below.


Click imagination hunt to read latest blogs.


Keep learning and sharing...
Read More »

Featured post

Think that makes you rich and richer

 Napolean said: “You can think and grow rich, but if you can be brought up like most people with work and you won't starve, this wil...